Looking for a way to get plumper, younger skin? Me too! Which is why I’ve taken up microneedling with my dermaroller again.
But what is microneedling? What does microneedling do to your skin?
I’m here to tell you all about it, including how I safely use a dermaroller to microneedle at home and how this simple collagen inducing therapy can help improve your skin.
*this post contains affiliate links*
The Benefits Of Microneedling
While painful (yes, it hurts like a bitch!), microneedling is great for:
-improving the look of scars and stretch marks (especially when paired with topica vitamin C on the treatment area!)
-boosting collagen and elastin production
-reducing the appearance of acne scars
-improving hyper pigmentation, dark spots and sun damage
-encouraging hair growth (when combining minoxidil lotion and microneedling)
-reducing the look of pores and fine lines/wrinkles
-improving the appearance of cellulite
-increasing product absorption
-plumping lips and skin
-promoting firmer, toned skin
If you suffer from rosacea, sensitive skin, sunburn or acne, microneedling should be avoided. You can see a before and after of microneedling benefits for acne scarring below.
RELATED READING: Reducing Acne Scars And Boosting Collagen With Banish!

Microneedling Creates Microscopic Punctures In The Skin
Microneedling – a form of collagen induction therapy – is the insertion of very fine, short needles (or micro needles) into the skin in order to stimulate collagen production and blood circulation through the skin’s natural self-repair process.
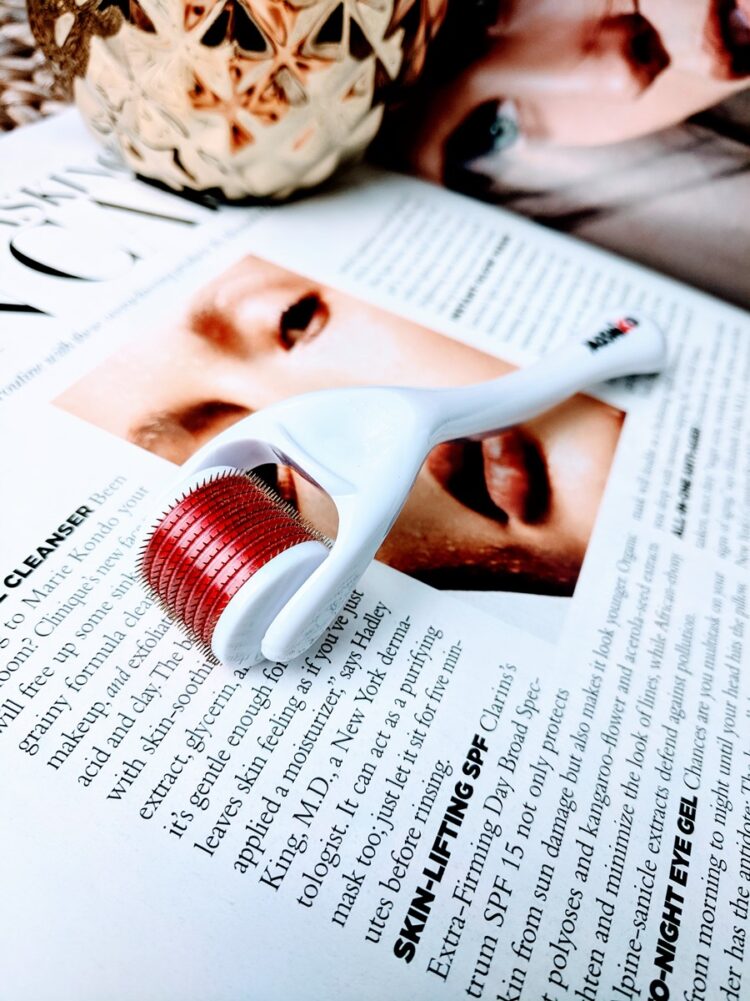
Microneedling can be done professionally or on your own at home, and uses micro needles ranging in diameter from 0.5-2.5mm which create tiny, pin-prick punctures all over the top-layer of skin when they are rolled over it. Professional microneedling treatments are done in-office by a dermatologist using topical anaesthetic and a derma-pen and are recommended for the treatment of deep wrinkles and scars. The at-home, DIY version of microneedling is done with a tool known as a dermaroller, which is pretty much a paint roller with tiny pins sticking out of it. You can see a dermaroller in action in the Instagram post further down.

Microneedling Stimulates Collagen Production
The small punctures made in the skin from microneedling stimulate the skin to repair itself, which promotes collagen production. What is collagen? Collagen is responsible for keeping our skin healthy and plump, and it unfortunately decreases as we age. As our skin becomes less plump, it becomes more prone to fine lines and wrinkles, as well as sagginess – no thanks!
Since microneedling stimulates collagen production, it’s a great way to treat acne scarring, enlarged pores, stretch marks and hyper-pigmentation, because it is stimulating the skin to repair and improve itself. Microneedling can be done on both the face and body – many people use microneedling on the stomach area to firm it up after childbirth, which can be done in a professional office or at home using a dermaroller with needles at least 1mm long.
According to a 2008 study, skin treated with four professional microneedling sessions spaced one month apart produced up to a 400% increase in collagen and elastin six months after completing treatment – impressive!
Does Microneedling Hurt?
If anyone tells you that microneedling or dermarolling doesn’t hurt, they are lying bastards! From my experience dermarolling my face, I can tell you that there are different pain sensations for each area of your face. The areas around my eyes and on my nose hurt like hell, while the fattier areas of my face, like the cheeks and jawline, are way less sensitive. I apply light pressure when dermarolling, but it’s still uncomfortable – not gonna lie! I use 1mm needles on my face.
My Dermarolling Experience & Microneedling Results
I purchased my dermaroller from Amazon a couple years ago. I used it a couple times but hated the pain that went along with and became slightly lazy when I got pregnant and had my second daughter. I shoved my dermaroller into a drawer and forgot about it. However, after reading an article about anti-aging skin care tips (I can’t remember where though), a dermatologist mentioned how important microneedling is for stimulating collagen production as we age and recommended dermarolling twice a week for best results.
This article pushed me to disinfect my dermaroller and get (painfully) rolling again – and I’m glad I did!
Overall, my skin looks more healthy and radiant whenever I add microneedling into my routine.
After a few weeks of dermarolling 1-2 times a week, I began to notice that my pores look smaller and my skin looked plumper and firmer. And these results are the only reason I endure the pain of this medieval torture device – it works! But results differ for everyone and can take time, so don’t expect miracles over night. I’m thinking about dermarolling some annoying stretch marks on my body next, but I’m not sure my boobs will like that very much…
My At-Home Dermarolling Guide
*disclaimer: I am not a dermatologist and this article does not constitute medical advice – please see your dermatologist before practicing dermarolling.
At-home dermarolling carries a risk of infection.
How to Choose A Dermaroller
First, you need to consider the micro needle size to use based on the area you are treating and the results you are looking to achieve. The recommended micro needle puncture depth required for effective results is between 0.5mm and 1mm for the face; anything smaller than 0.5mm hasn’t been found to promote collagen production and 1.5mm needles and larger cannot be used on the face.
If you are looking to treat your face at home, I would recommend starting with a 0.5mm dermaroller.
Dermaroller needles of 0.2-0.3mm are recommended if you are looking to increase product absorption only.
BUY ONE: Anthropologie | Amazon | Olivela | Gilt | Nordstrom
How To Disinfect A Dermaroller
The needles of your dermaroller will be puncturing your skin and therefore MUST be properly cleansed and disinfected before and after EVERY use to kill bacteria and avoid infection.
Leaving the dermaroller submerged in 99% isopropyl alcohol for 5 minutes is the easiest way to clean and disinfect the needles.
Also be sure to inspect the dermaroller and ensure none of the needles are damaged or bent. I dropped one of my dermarollers last year and bent a couple of the needles and immediately tossed it – damaged needles could do even more damage to your skin, so don’t take a chance!
How To Use A Dermaroller (Face)
1 – Make sure your dermaroller is properly disinfected (see above).
2 – Properly cleanse your face and hands and have clean towels on hand.
3 – To increase product absorption, use a gentle chemical exfoliant to remove any dead skin. (If you have sensitive skin or are new to dermarolling, I would skip this step until you determine how your skin handles dermarolling first).
4 – Apply a serum to your face; preferably one with hyaluronic acid in it.
5 – Take your dermaroller and gently roll it 2-3 times vertically, horizontally and diagonally over every surface that you want to treat on your face (avoid your eyelids!). Your goal is to get as many punctures on your skin as possible to stimulate the most collagen possible (like irrigating your lawn).
6 – Immediately after dermarolling, apply a dedicated hyaluronic acid serum to your skin (Iyou can browse some great hyaluronic acid serums here). You can also use a soothing aloe gel as well to reduce any discomfort.
7 – Avoid potentially irritating products or ingredients like retinol, vitamin C, menthol, alcohol, acids or fragrances after dermarolling.
8 – Apply a hydrating moisturizer (I use The Ordinary’s Natural Moisturizing Factors – super gentle and hydrating!). As an optional step, finish with a facial oil (I use the Kosmea Rosehip Facial Oil).
9 – Properly clean and disinfect the dermaroller and let it dry thoroughly in an open area.
10 – Avoid applying makeup directly after a dermarolling session (I normally dermaroll in the evening and allow my skin to recover overnight).
FYI: Hyaluronic acid has been found to boost skin healing and rosehip oil is great for promoting skin regeneration.
What to expect? After an at-home dermarolling session on my face, my skin generally looks pink and is slightly sensitive.
I also experience a bit of mild stinging, which fades shortly afterwards.
How Often Can You Dermaroll?
A 0.5mm can be used 1-2 times a week, depending on how your skin tolerates and recovers from dermarolling. 1mm needles can be used every 4-6 weeks and no more than twice in one month.
Be sure to always listen to your skin; it’s natural for your skin to look pink and be more sensitive immediately after dermarolling; this pinkness should fade over the course of a day or so and your skin should return to its normal sensitivity shortly thereafter.
However, if you experience continued irritation, dryness or redness, avoid dermarolling altogether. If you notice signs of infection, see your doctor.
Shop For Microneedling Must-Haves
Have you tried microneedling or dermarolling?
I love the microneedling results I achieve with my dermaroller!